
Guide for IPv6 Settings
Internet Protocol, briefly called as IP, is employed for internet addressing. So far, several generations of IPs have been operated, one of which being IPv4. Despite its numerous benefits, IPv4 can no longer respond to increasing needs of the huge number of internet users, considering fast-flying development of number of users and problems. Today, the needs for expansion of IP-based services and a new method or technology which is able to support a great number of users and provide them with a high array of IP addresses are more pressing than ever. Accordingly, IPv6 was designed as a response to the new needs of internet users so as to enable provision of different IP services for a great number of users—both quantitatively and geographically. Making use of IPv6, addressing space is multiplied and, thus, an extremely large number of unique IP addresses will be generated. These unique IP addresses will positively improve mechanisms of accessibility and security provisions.
Note: Due to the difference between Android operating system’s User interfaces “UI” on different phones, there is a possibility of minor changes to settings of some devices as compared to the displayed images.
1- First select “Settings”.

2- From "Settings" menu, enable "SIM Cards & mobile networks" option.

3- Select RighTel SIM Card.

4- Select "Access Point Names" option.

5- Select "RighTel" from the list of visible APNs.

6- Select "APN protocol" option.

7- In "APN protocol" settings, select IPv4 / IPv6.


8. Select "Save" via three points at the top of page or in "More" section.


2- In Connections setting, select Mobile Networks


3- Select Access Point Names option.

4- From the existing APN, select the RighTel item.

5- Select the APN protocol option.

6. In the settings for APN protocol, select IPv4 / IPv6.

1- Select the Application option and then Settings.
2- Select the Mobile Networks menu..
3- Select the Access Point Names option.
4- From the available APN, select the RighTel option.
5- Select the APN protocol option.
6- In the settings for the APN protocol, select IPv4 / IPv6.
In order to activate and use IPv6 on the 3G dongle, the DWM 157 should go through the following steps.
In the image below, first click on the Option (Option 1), then select the Profile Management option (option 2) and finally click on the Edit option (Option 3).
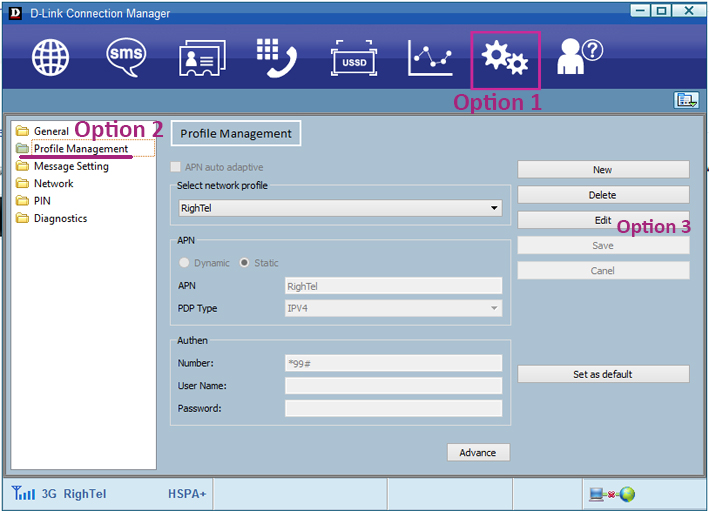
By choosing the Edit option, you can make changes to existing settings.
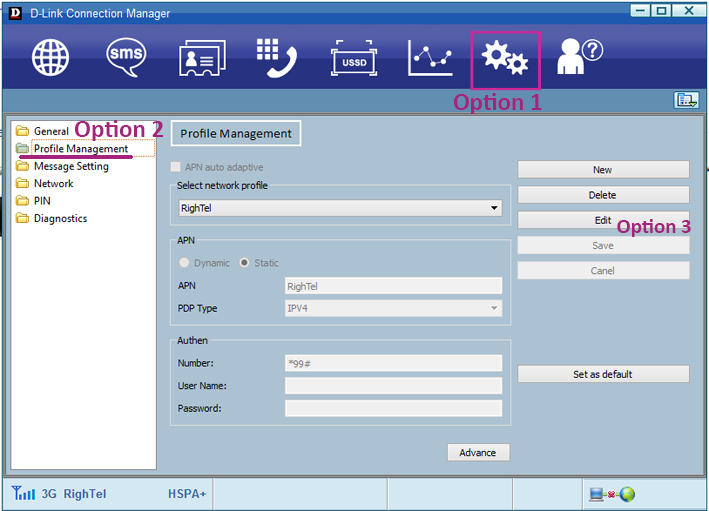
In order to activate and use IPv6, select IPV4V6 (Option 4) under the PDP Type menu, and then click Save (Option 5). In this case, you will also be able to use IPv6.
In order to activate and use IPv6 on the DWR 730 RighTel Modem, you should follow the below steps.
Click on the Internet option (Option 1), then select Connection (Option 2) and finally click on the User Profile option (Option 3).
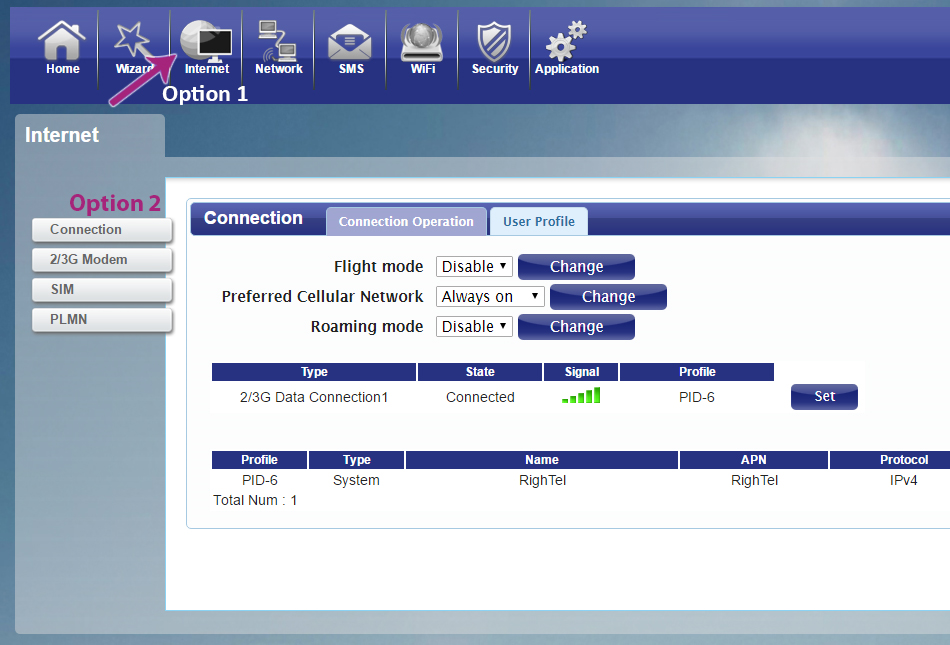
As shown in the below image, the current settings are visible by opening the tab. To set up a new APN to enable and use IPv6, click on the Add option and apply the following settings:
APN Method: CHAP or Auto
Connect Mode: IPV4/V6
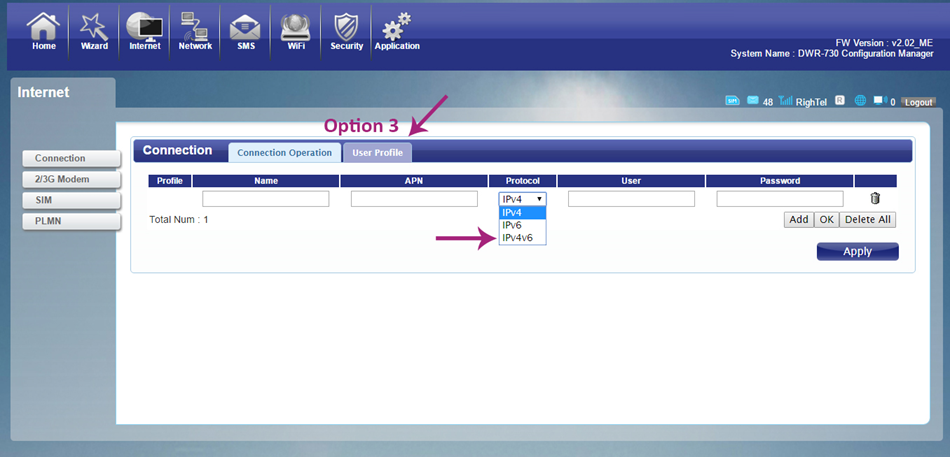
After applying the required settings, click on the Apply option. As you can see in the screenshot below, you can see the settings done on the modem by clicking on the Connection Operation tab. After rebooting the device, you will be able to use IPv6.
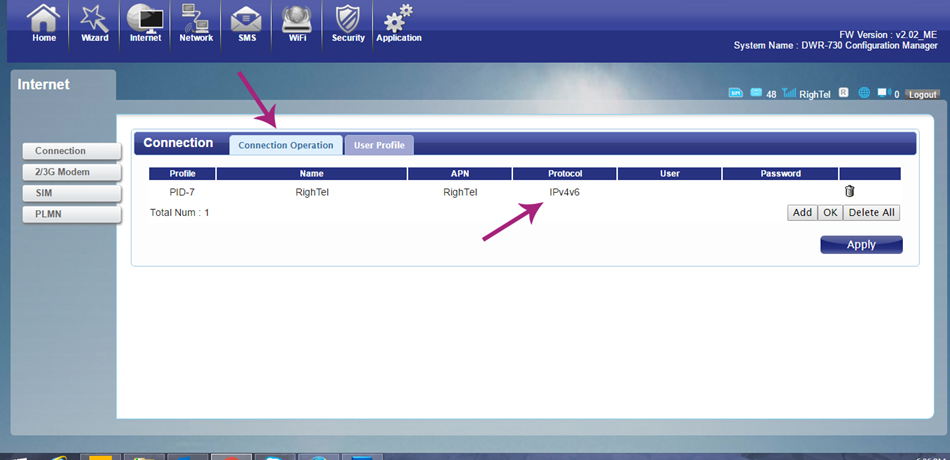
How to activate:
In order to activate and use IPv6 on the modem of the TP Link M7350 router, you can do two things:
First method: Wizard menu
Click the Create button to apply the settings from the Wizard menu.
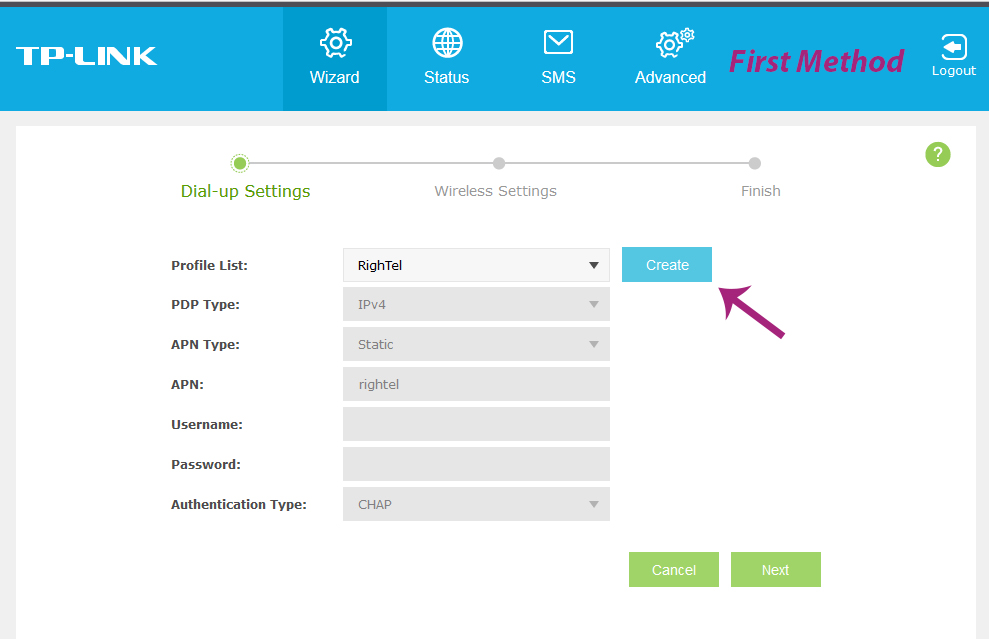
In the open window, do the following:
PDP Type: IPv6
APN Type: Static
APN: RighTel
Username:
Password:
Authentication Type: CHAP
Note that there are no values for the Username and Password section.
After making the settings and clicking on the Save option, and also after restarting the device, you can use the high-speed version of the Voice over IPv6 protocol.
Second method: Advanced menu
In this method, first click on the Advanced option (option 1), then select the Dial-up menu (Option 2) under the Dial-up Setting menu (Option 3).
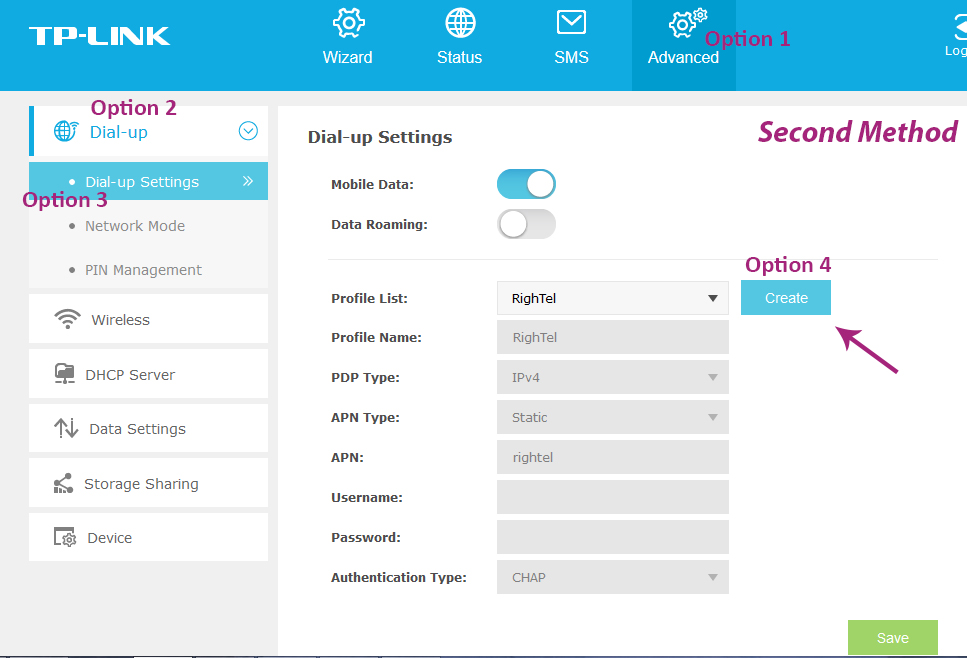
In the window that opens, click Create (option 4) and then apply the following settings:
PDP Type: IPv6
APN Type: Static
APN: RighTel
Username:
Password:
Authentication Type: CHAP
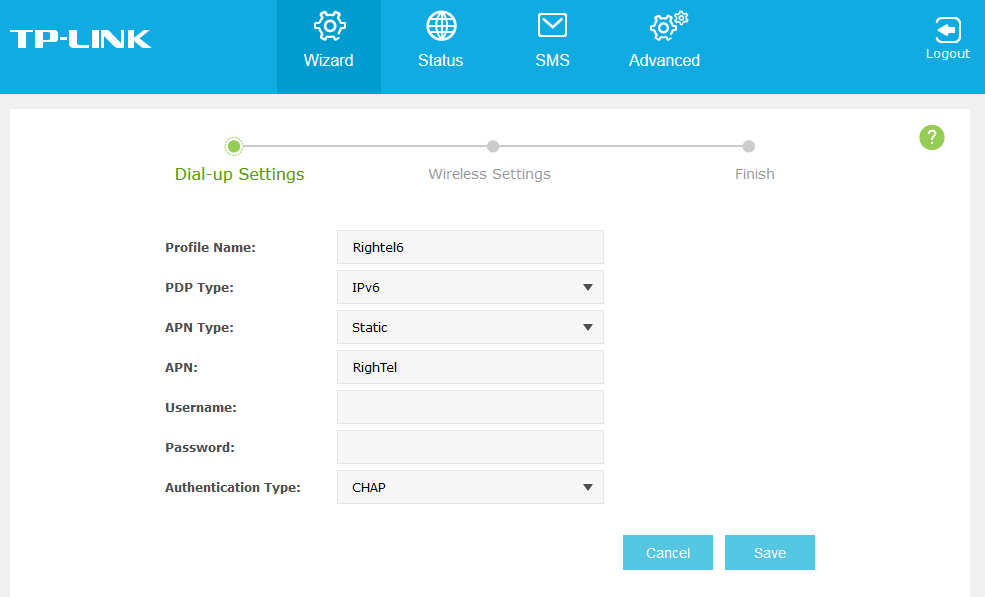
It should be noted that in this type of modem, between IPv4 and IPv6 protocols, you can only select an option (Option 5).
- How to Update Firmware
- How to activate
How to Update Firmware
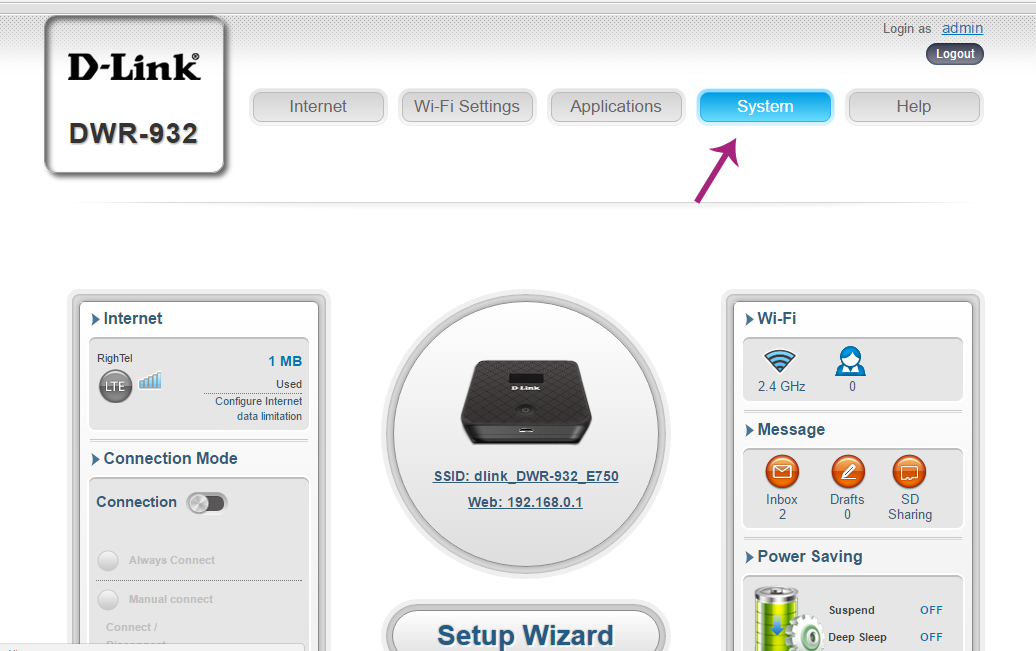
In order to activate IPv6 on 932 D1 series devices, the firmware must first be updated. To do this, follow the screenshot below, on the main screen of the device panel, select System.
In the menu that appears, go to the Firmware Upgrade menu (Option 1) and from the Upgrade my router menu, change the option to Remote Server (Option 2). Then click on the Start update option (Option 3) to start the update phase.
Depending on the size of the update required and the speed of the network, this process will take between 10 and 30 minutes. During the update period, the device should not be turned off or left out of range and network. After receiving the full file, the device will automatically install the file and reboot the modem. It should be noted that after the update, some basic settings, such as the login password to the panel, will be returned to its original state.
How to activate
In order to activate and use IPv6 on the DWR 932 D1 model, you can do two of the following (as pictured):
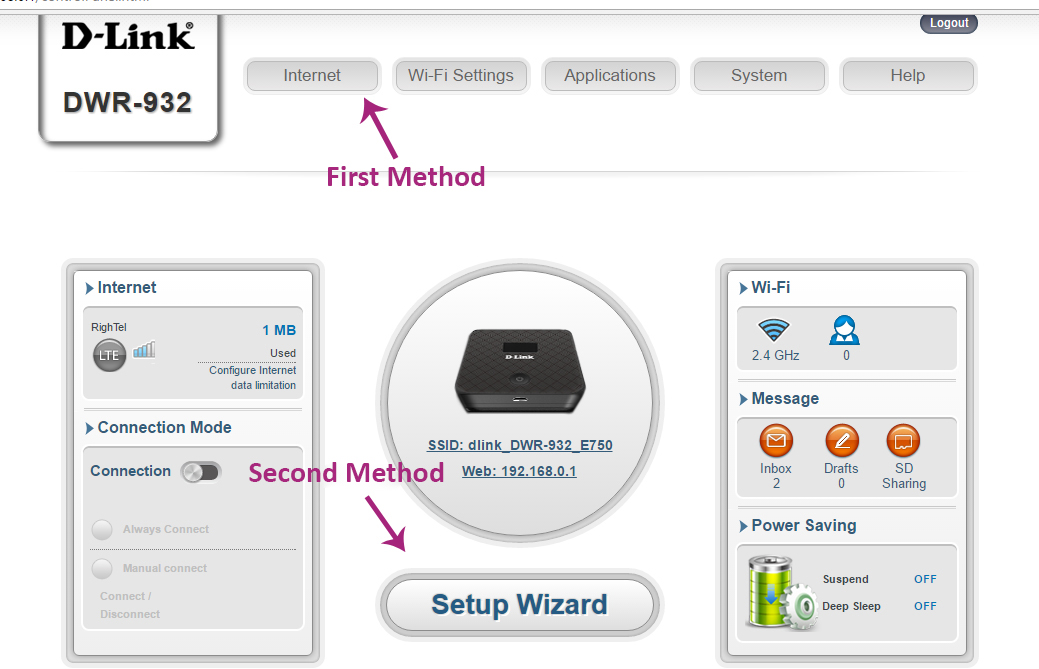
First method: From the Internet menu
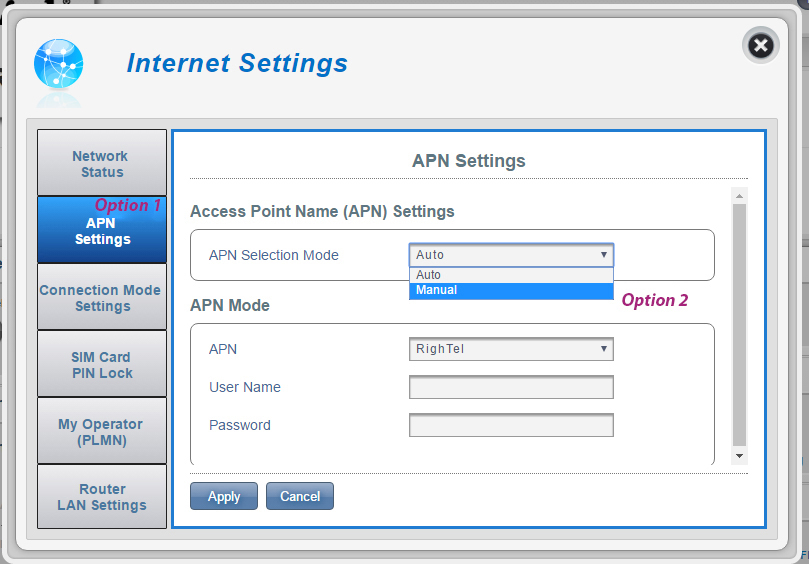
Click the Internet option first, then select the APN Settings menu (Option 1), then select the Manual option under Option 2 under the APN Selection Mode menu.

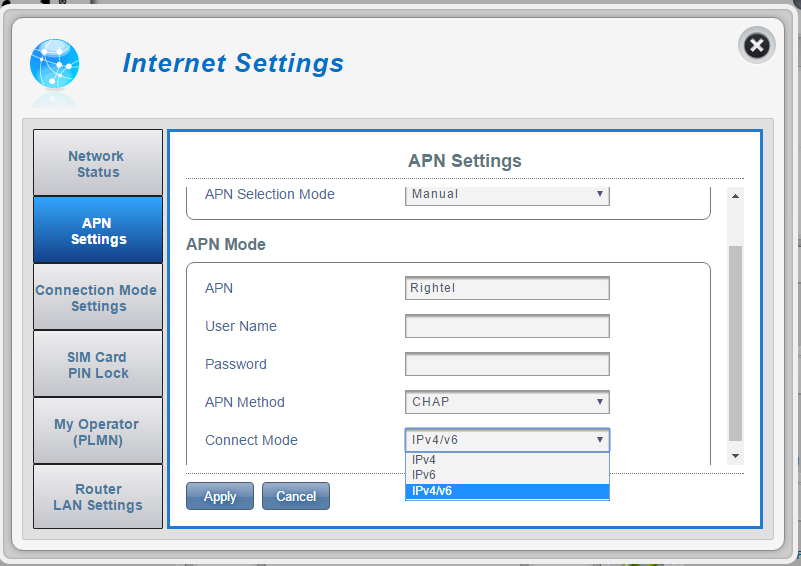
After selecting the Manual option, you will be able to make definitions for you, according to the following values, make the settings:
APN Method: CHAP or Auto
Connect Mode: IPV4/V6
After applying the settings, click Apply. After rebooting the device, you can use IPv6.
Second method: from the Setup Wizard menu
Click the Setup Wizard (Option 1) first as shown below.
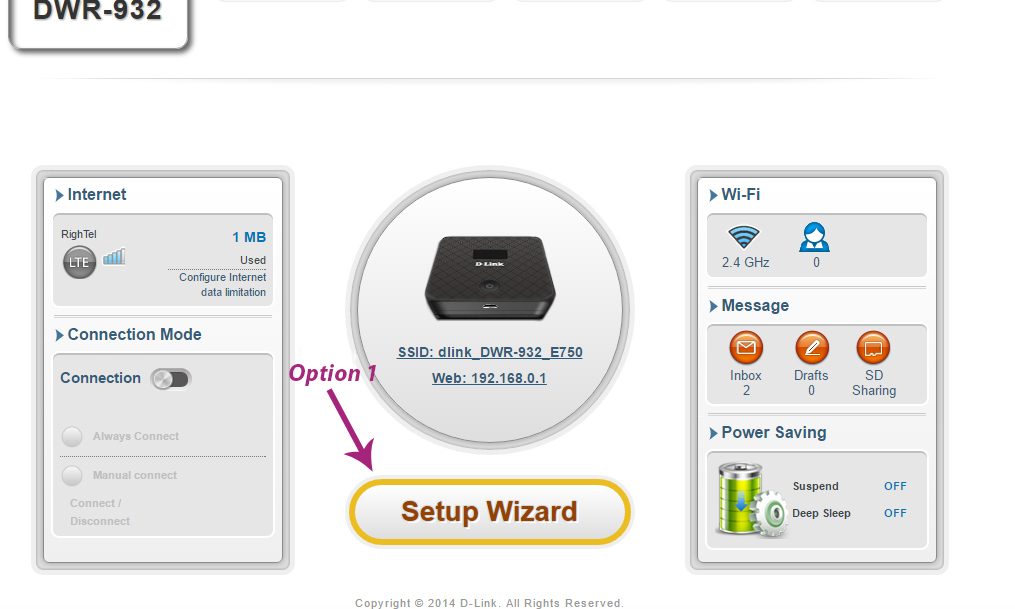
Then in the Connection Setting menu (Option 2), select the Manual option under the APN Selection Mode menu.
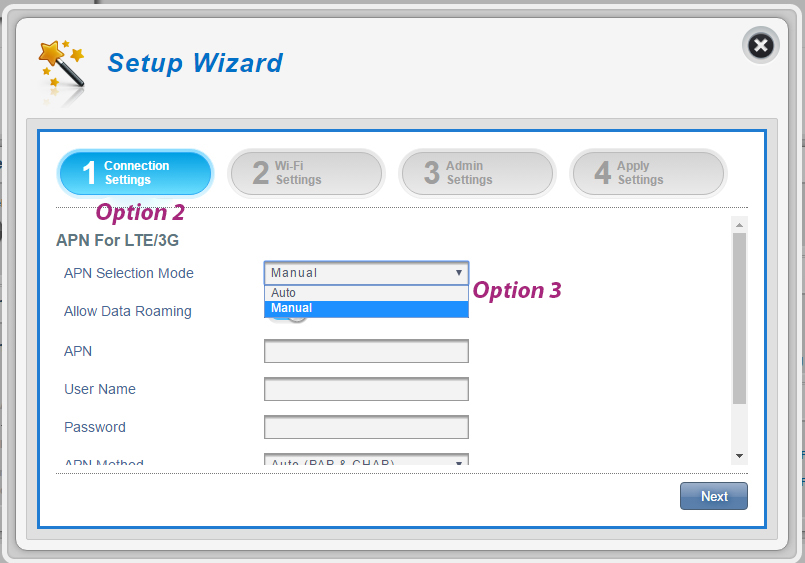
After selecting the Manual option (Option 3), it will be possible to perform definitions. Accordingly, make adjustments according to the following values:
APN Method: CHAP or Auto
Connect Mode: IPV4/V6
After applying the settings, click on the Next option and continue the steps as before. After connecting the device to the network, the use of IPv6 will be provided to the device.
In order to activate and use IPv6 on the router modem of the TP-Link Archer MR200, you must follow the steps below. To apply the desired settings in the home page, click on the advanced option, in the opened page, click on the Internet menu, and then click on the Create Profile link at the bottom of the page.
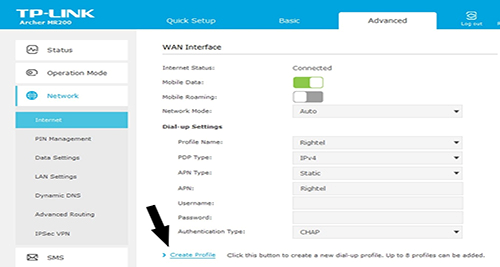
In the popup window, do the following:
PDP Type: IPv4 & IPv6
APN Type: Static
APN: RighTel
Username:
Password:
Authentication Type: CHAP
Note that there are no values for the Username and Password section.
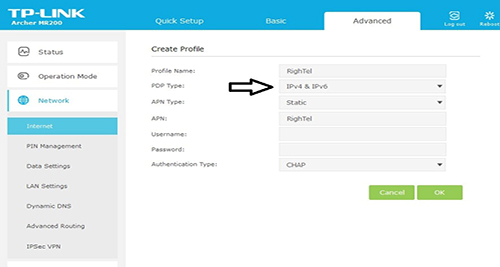
After making the settings and clicking the OK button, and also after restarting the device, you can use the IPv6 protocol of the high-speed router.


